
Puma (Puma concolor) Caught on Camera
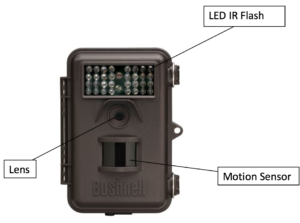
I initially started doing my own research and collecting data on wildlife as a freshman in high school after receiving my first camera trap as a birthday gift. This is a device that is programmed to take either pictures or videos (depending on the setting it is on) when motion is detected. It is used by researchers and hunters alike to track what species are present in a given region. Additionally, these instruments have several features that may be altered prior to placing them out in the field. These include photo and video quality, the number of photos taken in a row when activated, video length, flash or infrared night mode, time interval between picture/video taking, sensor level (determines how easily the camera is triggered), and an internal clock (it is important to set this to ensure that the time and date stamp on every picture and recording is accurate). While there are numerous different brands of trail cameras out there, the one I got was a Bushnell Trophy Cam model (see image below). Moreover, each type has a slit for an SD card that stores the captured data. Finally, a strap with a buckle is always included to tie the device to a tree.
Link to Source: http://säkerhetsprodukter.nu/overvakningskamera.htm
When I first started working with my new camera, I would play with the settings and try many different things. In particular, I experimented with both picture and video mode and frequently changed the video length (from anywhere between five seconds to a minute) and time interval between when photos/recordings could be taken (usually several seconds). Additionally, I got into a habit of taping a label on top of the camera that read, “Science Project: Please do not Disturb,” as well as added two labels on the inside of the device with my name and phone number.
Picture of a butterfly. Funnily enough, the photo after this one was of a man with a butterfly net.
The first locations at which I set up my camera included my house, the Santa Catalina Mountains to the north, and the Rincon Mountains to the east. For more detail on the data I collected at my home and the settings I used, check out my post “No Room In Avilla (SARSEF 2016)” under the “Research” tab. On this page here, though, I intend to focus primarily on camera trapping that was done more or less randomly in the mountains. Nonetheless, I won’t be stating the exact, specific sites I was at. Further, as a side note, I had a tendency at the time to throw away data that I didn’t think to be of any value, such as images that had nothing on them or pictures of hikers. Today I would HIGHLY advise against doing that, as one may never know when such information could come in handy. It may also be worth mentioning that I often employed bait to attract the animals. Carnivores were always the target, so my lure frequently consisted of the raw parts of a store-bought turkey that weren’t used in preparing dinner and would otherwise have been thrown out. Another form of bait I utilized was Calvin Klein’s “Obsession” for men (perfume), given that this has been known to attract wildcats. Once again, though, I question whether I should continue using these tactics in the future.

Another Puma
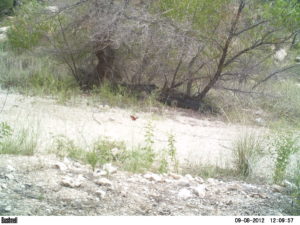
The first time I set up my camera in the mountains was in August to September of 2012; this was near a campground in the Santa Catalinas. The device was on photo mode with three pictures taken in a row once motion was detected. Here I had also thrown down the perfume mentioned above, as well as some raw meat. Evidently these seemed to have some effect, given that the cougar in the above image is sniffing right where the scent had been distributed. Overall I captured over 260 pictures, most of which included deer and hikers with their dogs. The photo below as well as the three above are all from this location.

Early in the Morning
The next time I went camera trapping in an area other than around my house was in the Rincon Mountains in 2013 near a watering hole. Unfortunately, though, I lost this data and don’t have the images anymore. This especially highlights how important it is to save files in more than one location. What I do remember is photographing (again, with three pictures taken in a row) lots of cattle and a bobcat. Then, when 2014 rolled around, I once again headed into the Santa Catalinas with the camera set to an eight-second video mode from February to March. I also believe I had utilized bait here. About 25 recordings were caught at this rocky, mountain-like site, many of which were of a gray fox.
Gray Fox (Urocyon cinereoargenteus)
The next place I was at was also in the Santa Catalinas on a hilly slope near a campground from March to April of 2014. Here I captured around 35 eight-second videos of primarily deer and a gray fox, and once again remember throwing down bait.
Deer Getting Spooked
Finally, in January of 2015 (January 9 – February 6), I returned to the same location I had been in in 2012, and set the camera to a ten-second video mode with the exact same bait types (raw turkey neck, liver, and heart, and perfume). About 45 recordings were captured of primarily human hikers with their dogs, in addition to a few with a gray fox. Nonetheless, it is worth noting that this was the first trip where I started writing things down in a notebook. At the time, I recorded the exact dates that the device was set up, site, elevation, species photographed, type of bait laid down, and any miscellaneous notes on how the animals behaved/what time they were caught on camera. Ever since then, I’ve kept doing this while taking much more specific notes (see the last paragraph).
Wait for it…
After these experiences, I started doing some more “purposeful” work by intentionally setting the camera up in specific locations to collect data for more definitive research goals (keep checking back on my website; I will be posting on these as they occur). Additionally, I’ve received more cameras since those first years. One model I’ve grown to love besides Bushnell is Browning. Overall, the photos and videos are of a much better quality (see my page “The Art of Camera Trapping” under “Tips and Hints” for more information on choosing a brand). As for my preferred settings, I now tend to go with ten-second videos and an interval of around five seconds between recordings. That is, if an animal is still moving in front of the motion sensor after the first ten-second video is complete, the device will wait five seconds before triggering again. Further, when I do go with photo mode instead, I program it to take three pictures in a row once activated. Moreover, I use infrared instead of flash at night since this won’t spook the animals and, even better, won’t alert humans as easily to the camera’s presence. The only downside to this is that the images will then be black and white instead of colored. Finally, I typically just keep the sensor level at “normal” and set pictures and videos to the highest quality available.

Deer Being Photographed
For these past couple years, I always used a two gigabyte SD card with eight alkaline AA batteries. Lithiums are typically recommended, though, as they usually have a longer lifespan. Additionally, I’d check the camera on average once every two months (for videos this is important; for pictures the interval could be more around once every 3-12 months depending on the model and how “busy” the region is). Nonetheless, all of these variables will change as I conduct more research in the future. Thus, whenever I make another post, I will always be mentioning the specific camera type, settings, SD card size, and types of batteries I used, as well as how often I would head out into the field to collect the data. That all being said, one area in which I’ve already improved is with note taking while out in the field. For each location, I now typically make two entries in my field journal; the first is for when I set the device up. Here I record the exact site (with GPS coordinates), date, SD card size used, what settings the trail cam was set to, battery power percentage to start with, and include a description of the region. When I return to pick the camera up or simply switch out the batteries and SD card, I utilize the second entry and write down the date, how many photos/videos were taken, how much battery percentage was left, when the last image was taken, why the camera stopped recording if it didn’t last the entire time, and estimate about what percentage of the data was of humans, false triggers, and animals. I also take note of whether I changed out the batteries and SD card and moved the device to a new location.